Configuring External-DNS with Technitium DNS Server
In this guide, we’ll configure External-DNS with Technitium DNS Server using RFC-2136 dynamic updates. This setup allows Kubernetes to automatically update DNS records, eliminating manual management.
We'll cover TSIG authentication, Helm deployment, and ingress configuration to ensure proper integration.
Let’s get started!
Step 1: Configure Technitium DNS Server
Before integrating External-DNS, we need to set up TSIG authentication and allow dynamic DNS updates in Technitium.
1.1 Configure TSIG Authentication
- Open the Technitium DNS server Web UI.
- Click on Settings → TSIG.
- Create a new TSIG key:
- Key Name: Set it to
external-dns(or any preferred name). - Algorithm: Use HMAC-SHA256 (recommended).
- Shared Secret: Leave blank to auto-generate a strong key or enter your own.
- Key Name: Set it to
- Click Save.
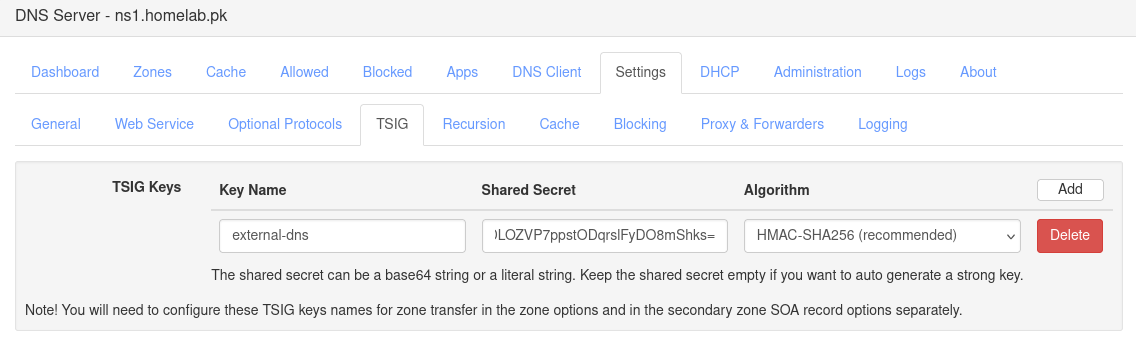
📌 TSIG (Transaction Signature) secures DNS updates and zone transfers, preventing unauthorized modifications.
1.2 Configure Your DNS Zone for Dynamic Updates
- Navigate to Zones and select the desired DNS zone.
- Click on Options → Zone Options.
- Configure the following:
- Query Access →
Allow (default) - Zone Transfer →
Deny(or adjust as needed) - Dynamic Updates (RFC-2136) → Set to "Allow" (important)
- Query Access →
- Scroll to Security Policy:
- TSIG Key Name → Select the key you created earlier.
- Domain Name → Enter your domain (
*.<your-domain>for wildcard support).
- Click Save.
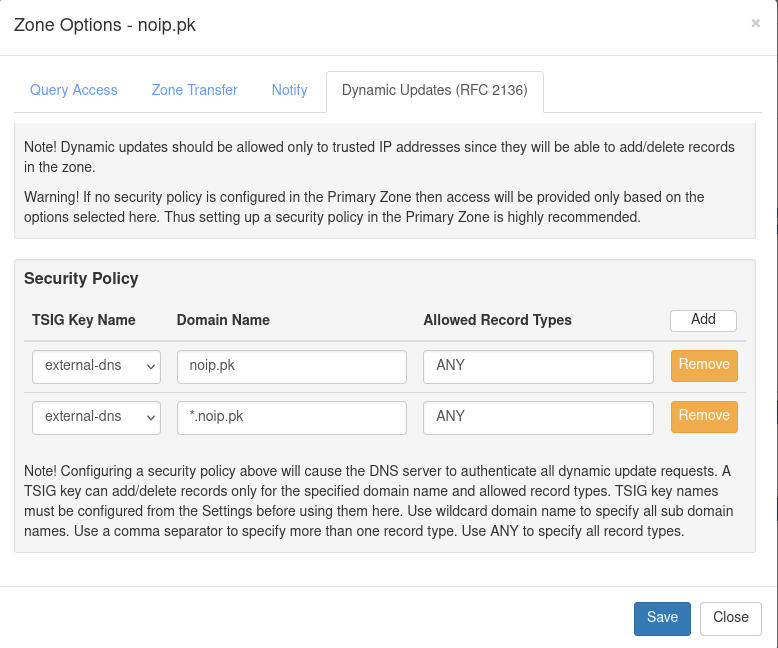
📌 If updates fail, ensure your TSIG key is correct and that the domain allows updates.
Step 2: Configure External-DNS
Now, let’s set up External-DNS using Helm.
2.1 Configure External-DNS Helm Deployment
First, add the External-DNS Helm repository:
1helm repo add external-dns https://kubernetes-sigs.github.io/external-dns/
2helm repo update
Create a values.yaml file with the following configuration:
 1provider:
 2  name: rfc2136
 3
 4extraArgs:
 5  - --rfc2136-host=192.168.0.21  # Technitium DNS IP
 6  - --rfc2136-port=53
 7  - --rfc2136-zone=noip.pk       # DNS Zone
 8  - --rfc2136-tsig-secret-alg=hmac-sha256
 9  - --rfc2136-tsig-keyname=external-dns # TSIG Key Name
10  - --rfc2136-tsig-axfr
To securely store the TSIG key in Kubernetes, create a secret:
1kubectl create secret generic tsig-key --from-literal=key="<PASTE_YOUR_TSIG_SECRET>"
Modify values.yaml to reference this secret:
1env:
2  - name: EXTERNAL_DNS_RFC2136_TSIG_SECRET
3    valueFrom:
4      secretKeyRef:
5        name: tsig-key
6        key: key
Now, deploy or upgrade External-DNS:
1helm upgrade --install external-dns external-dns/external-dns -f values.yaml
For reference, you can find a pre-configured External-DNS deployment in my Homelab repository:
➡️ GitHub - HomeOps External-DNS
Step 3: Verify DNS Updates
3.1 Create an Ingress Object
Create a file ingress.yaml with the following content:
 1apiVersion: networking.k8s.io/v1
 2kind: Ingress
 3metadata:
 4  name: example-app
 5  annotations:
 6    external-dns.alpha.kubernetes.io/hostname: app.noip.pk
 7spec:
 8  rules:
 9    - host: app.noip.pk
10      http:
11        paths:
12          - path: /
13            pathType: Prefix
14            backend:
15              service:
16                name: example-app
17                port:
18                  number: 80
Apply the Ingress:
1kubectl apply -f ingress.yaml
3.2 Verify DNS Updates in Technitium
- Refresh the DNS Zone in Technitium Web UI.
- Check if new DNS records are listed.
- If missing, restart the DNS server:
1systemctl restart technitium-dns
📌 Check External-DNS logs for errors:
1kubectl logs -l app=external-dns
Conclusion
By following these steps, External-DNS will dynamically update Technitium DNS, automating record management for Kubernetes workloads.
🚀 Need troubleshooting? Ensure your firewall allows updates, and verify TSIG settings in Technitium.