Configuring Single Sign-On (SSO) for Linux Systems
Configuring Single Sign-On (SSO) for Linux Systems using Keycloak and PAM with kc-ssh-pam
In this guide, we will configure single sign-on (SSO) for a Linux system using Keycloak and PAM with kc-ssh-pam. This will allow users to log in to the Linux system using their Keycloak credentials.
Prerequisites
Before we begin, make sure you have the following:
- A running instance of Keycloak.
- Administrative access to the Keycloak Administration Console.
- Administrative access to the Linux system.
- kc-ssh-pam installed on the Linux system.
Downloading and Installing kc-ssh-pam
To get started with installing kc-ssh-pam, you'll need to download the appropriate file based on your system architecture.
Here's how you can download the appropriate file:
-
Navigate to the kc-ssh-pam GitHub release page at https://github.com/kha7iq/kc-ssh-pam/releases.
-
Scroll down to the "Assets" section and find the file that corresponds to your system architecture. The file names are in the format
kc-ssh-pam_<version>_<arch>.<extension>, where<version>is the version number,<arch>is your system architecture (e.g., amd64), and<extension>is the file extension (e.g., deb or rpm). -
Click on the download link next to the appropriate file.
With the appropriate file downloaded, you can proceed with installing kc-ssh-pam.
Install
There are a few ways to do this:
1- DEB
2# If you're using a Debian-based distribution, you can install kc-ssh-pam using the following command.
3sudo dpkg -i kc-ssh-pam_amd64.deb
4- RPM
5# If you're using a Red Hat-based distribution, you can install kc-ssh-pam using the following command:
6sudo rpm -i kc-ssh-pam_amd64.rpm
Manual
If you prefer to install kc-ssh-pam manually, you can do so by following these steps:
-
Choose the desired version of kc-ssh-pam.
export KC_SSH_PAM_VERSION="0.1.1" -
Download the kc-ssh-pam archive.
wget -q https://github.com/kha7iq/kc-ssh-pam/releases/download/v${KC_SSH_PAM_VERSION}/kc-ssh-pam_linux_amd64.tar.gz -
Extract the archive.
tar -xf kc-ssh-pam_linux_amd64.tar.gz -
Make the kc-ssh-pam binary executable.
chmod +x kc-ssh-pam -
Create a directory for kc-ssh-pam.
sudo mkdir -p /opt/kc-ssh-pam -
Move the kc-ssh-pam binary and configuration file to the directory.
sudo mv kc-ssh-pam config.toml /opt/kc-ssh-pam
This completes the installation of kc-ssh-pam.
Configuring kc-ssh-pam
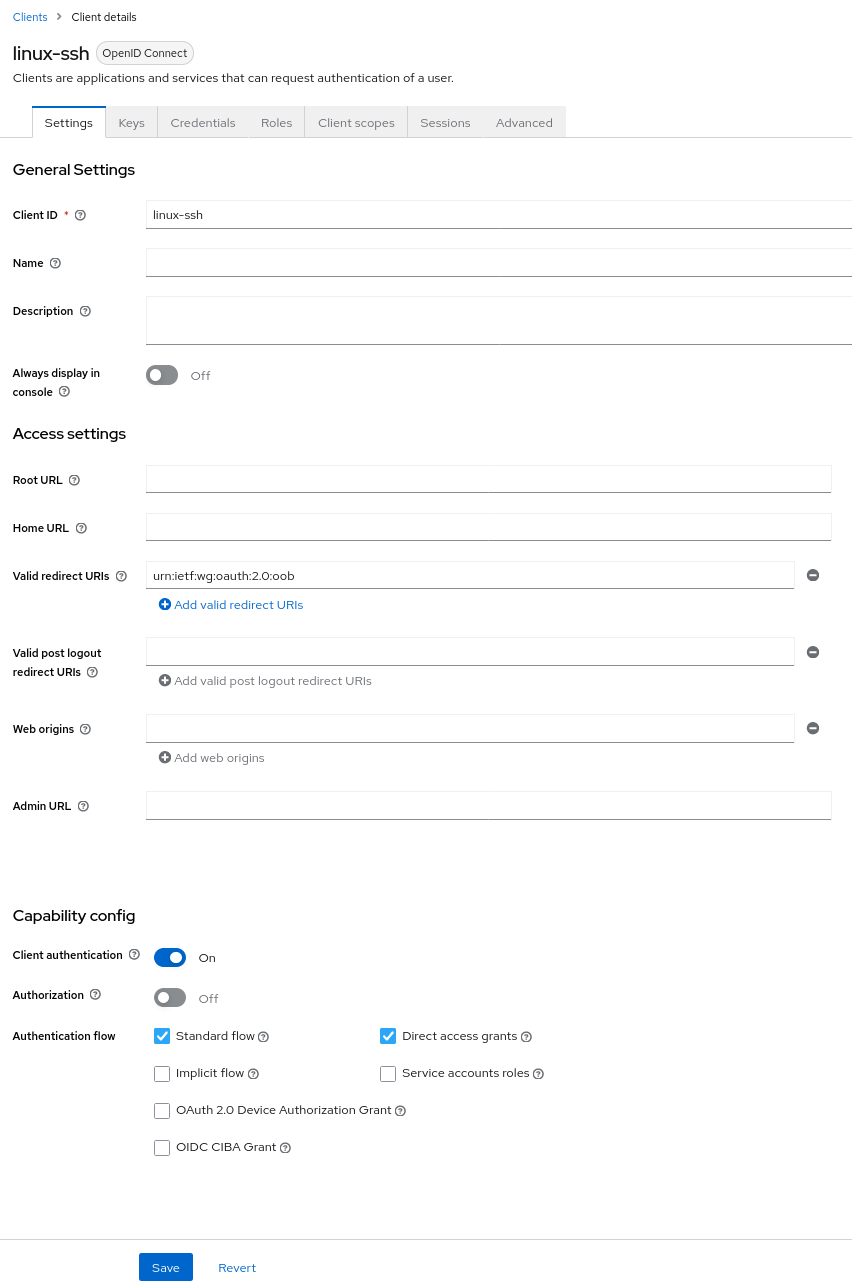
The first step in configuring kc-ssh-pam is to create a keycloak client that will be used for authentication with kc-ssh-pam
Steps
Follow these steps to create a Keycloak client:
-
Log in to the Keycloak Administration Console.
-
Select the realm for which you want to create the client.
-
Click on
Clientsfrom the left-hand menu, and then click on theCreatebutton. -
In the "Client ID" field, enter
linux-ssh. -
Set the "Client Protocol" to
openid-connect. -
In the "Redirect URIs" field, enter
urn:ietf:wg:oauth:2.0:oob. -
In the "Access Type" field, select
confidential/Client authenticationin newer version. -
In the "Standard Flow Enabled" field, select
ON. -
In the "Direct Access Grants Enabled" field, select
ON. -
Click on the
Savebutton to create the client.
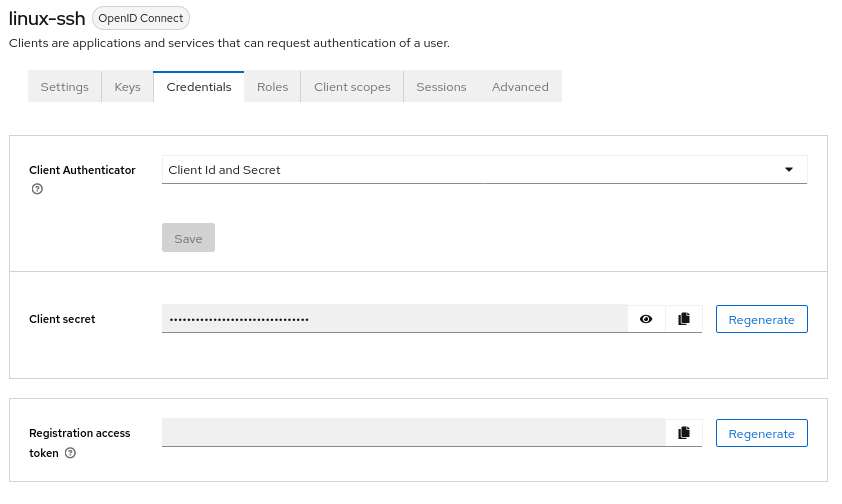
To get the credentials of the client, follow these steps:
-
Go to the
Clientspage in the Keycloak Administration Console. -
Select the
linux-sshclient from the list. -
Click on the
Credentialstab. -
The client secret will be displayed under the "Client Secret" section.
In the next step, we'll create a configuration file named config.toml.
Add the following contents to the config.toml file:
1realm = "ssh-demo"
2endpoint = "https://keycloak.example.com"
3clientid = "linux-ssh"
4clientsecret = "MIKEcHObWmI3V3pF1hcSqC9KEILfLN"
5clientscope = "openid"
Replace realm, endpoint, clientid, clientsecret, and clientscope with the appropriate values for your Keycloak instance.
Next, edit the /etc/pam.d/sshd file and add the following line at the top of the file:
auth sufficient pam_exec.so expose_authtok log=/var/log/kc-ssh-pam.log /opt/kc-ssh-pam/kc-ssh-pam
This line tells PAM to use pam_exec to execute the kc-ssh-pam binary with the given arguments.
Note that the auth sufficient keyword means that authentication will succeed if this module succeeds, but the system will still try other authentication methods if this module fails.
The expose_authtok option tells PAM to pass the user's password to the kc-ssh-pam binary.
The log=/var/log/kc-ssh-pam.log option tells PAM to log the output of kc-ssh-pam to /var/log/kc-ssh-pam.log.
Finally, the /opt/kc-ssh-pam/kc-ssh-pam argument specifies the location of the kc-ssh-pam binary.
User accounts are not automatically created during login, so a local user must be present on the system beforehand.
To automatically create a user, Install the libpam-script package.
apt-get install libpam-script
Add the following line to the /etc/pam.d/sshd file:
auth optional pam_script.so
This line tells PAM to use pam_script to execute the script defined in /usr/share/libpam-script/pam_script_auth.
The contents of /usr/share/libpam-script/pam_script_auth should be:
1#!/bin/bash
2adduser $PAM_USER --disabled-password --quiet --gecos ""
In PAM modules, the username is given in the $PAM_USER variable.
Make the script executable:
chmod +x /usr/share/libpam-script/pam_script_auth
Restart the SSH daemon
sudo systemctl restart sshd
Testing login with 2FA

Conclusion
In this guide, we have enabled single sign-on authentication with kc-ssh-pam on linux with 2FA. Users will be able to log in to the Linux system using their Keycloak credentials.